 Anabelle
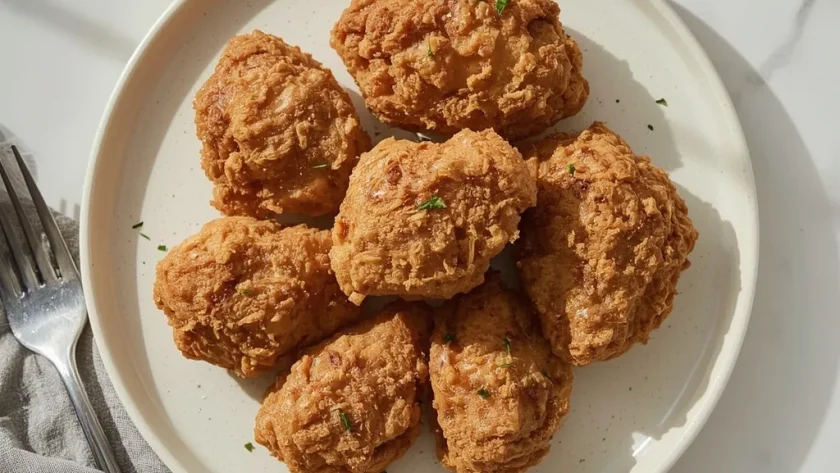
 This Pioneer Woman Fried Chicken delivers everything you want from a Southern classic — a shatteringly crisp crust that gives way to impossibly juicy meat. Brined in seasoned buttermilk and coated in a spiced flour blend, each bite brings savory depth with a gentle peppery kick.
You can have this on the table in about 2 hours and 45 minutes total, with just 30 minutes of active prep. It’s an intermediate-level recipe — the frying technique requires a bit of attention, but the buttermilk brine does most of the heavy lifting for flavor and tenderness.
A Quick Glimpse at Pioneer Woman Fried Chicken
Whole chicken pieces soak in a tangy buttermilk brine infused with hot sauce and kosher salt for at least 2 hours. After a thorough dredge in seasoned flour with a touch of baking powder, the chicken fries up in about an inch of hot oil until deeply golden. The crust shatters when you bite into it, while the meat stays remarkably moist and tender throughout.

Why This Recipe is Worth Trying
This recipe earned its reputation for good reason — the technique and flavors come together in a way that consistently delivers.
- Buttermilk brine — The acidity tenderizes the meat while infusing every bite with tangy flavor from the inside out.
- Baking powder in the coating — This simple addition creates extra surface area for a lighter, crispier crust that stays crunchy longer.
- Double-dip method — Going from marinade to fresh buttermilk to seasoned flour builds a thicker, more substantial coating that clings properly.
- Hot sauce kick — A couple tablespoons of Frank’s adds subtle heat that brightens the rich flavor without overwhelming the chicken.
- Wire rack resting — Letting the coated chicken sit before frying helps the flour adhere, preventing patchy spots during cooking.
Essential Ingredients for This Recipe
You only need about 13 ingredients for this dish, and most of them are probably already in your pantry. Here is what makes each one matter.
The Buttermilk Brine
- 2 cups buttermilk, full-fat — This is the backbone of the marinade, tenderizing the meat and adding that signature tang. Full-fat gives the richest flavor, but low-fat works in a pinch.
- 2 tbsp hot sauce — Frank’s RedHot is the classic choice here, delivering vinegary heat that cuts through the richness without dominating.
- 1 tbsp kosher salt — This seasons the meat deeply during the brine. If you only have table salt, use half the amount.
- 1/2 tsp black pepper, freshly ground — The pepper adds gentle warmth that builds as the chicken brines.
The Seasoned Flour Coating
- 2 cups all-purpose flour — Standard all-purpose gives the right structure for a sturdy, crunchy crust that holds up during frying.
- 1 tbsp baking powder — This is the secret to extra crispness — it creates tiny air pockets in the crust as it fries.
- 1 tsp smoked paprika — Adds a subtle smoky depth and gives the crust that beautiful amber color.
- 1 tsp garlic powder — Savory garlic flavor that infuses the coating without burning.
- 1 tsp onion powder — Complements the garlic and adds a mellow sweetness to the crust.
- 1/2 tsp cayenne pepper, optional — Skip it if you prefer mild heat, or keep it for a spicy kick that lingers pleasantly.
- 1/2 tsp black pepper — The second half of your pepper goes in the flour, seasoning the crust itself.
For Frying
- 2 cups buttermilk, for dredging — A fresh bowl of buttermilk between the marinade and the flour creates that thick, even coating.
- 4 cups vegetable oil — Canola or peanut oil both work beautifully. You need enough to fill your pan about an inch deep.
- 1 whole chicken, cut into 10 pieces — Halved breasts, thighs, drumsticks, and wings give everyone their favorite part.
Useful Equipment
Nothing fancy required here — just a few kitchen staples that most home cooks already own. Here is what you need and why.
- Large cast-iron skillet or Dutch oven — The heavy bottom holds heat steadily, keeping oil temperature consistent. A deep, wide pot works too.
- Wire rack set over a baking sheet — This is essential for draining the chicken properly; paper towels trap steam and ruin crispness.
- Tongs — A good pair lets you turn the chicken safely and pick it up without splashing hot oil.
- Deep-fry thermometer — Not strictly required, but it takes the guesswork out of oil temperature. A pinch of flour should sizzle immediately when the oil is ready.
- Shallow dish or pie plate — The perfect vessel for your seasoned flour mixture, giving you room to press the coating on thoroughly.
Directions to Make Pioneer Woman Fried Chicken
This process has several steps, but each one is straightforward. Take your time with the coating and the frying, and you will be rewarded with exceptional results.
- Make the brine — Whisk together 2 cups buttermilk, hot sauce, 1 tablespoon kosher salt, and 1/2 teaspoon black pepper until the salt dissolves completely.
- Marinate the chicken — Submerge all chicken pieces in the buttermilk mixture, cover, and refrigerate for at least 2 hours or up to 24 hours for maximum tenderness.
- Bring to room temperature — Pull the chicken from the fridge 20–30 minutes before frying. Cold meat drops the oil temperature dramatically.
- Prepare the flour — Whisk flour, baking powder, smoked paprika, garlic powder, onion powder, cayenne if using, and remaining black pepper in a shallow dish.
- Set up your station — Arrange the chicken, a bowl of fresh buttermilk, the seasoned flour, and a wire rack in a neat assembly line.
- Coat each piece — Let excess marinade drip off, dip into plain buttermilk, then press firmly into the flour until every nook is covered. Place on the wire rack.
- Rest before frying — Let the coated chicken sit 10–15 minutes. This is not optional — it helps the coating stick during frying.
- Heat the oil — Fill your skillet with oil to about 1 inch deep and heat over medium-high until it shimmers. A thermometer should read 350°F (175°C).
- Fry in batches — Place chicken skin-side down in a single layer, leaving space between pieces. Do not overcrowd the pan.
- Turn and cook through — Flip every 3–4 minutes until deep golden brown. Dark meat takes 12–15 minutes, white meat 10–12, reaching 165°F (74°C) internally.
- Drain properly — Transfer to a clean wire rack and season with flaky salt immediately. Let rest 5 minutes before serving, never on paper towels.
- Manage between batches — Return oil to 350°F (175°C) between batches and skim any floating debris for clean frying.

What I Got Wrong (And How I Fixed It)
These mistakes cost me a few batches of sad, soggy chicken before I figured out what was happening. Learn from my failures.
- Skipping the rest period — Coating straight from the flour into the oil meant half the crust fell off during frying. Letting the chicken sit for 10 minutes fixed this completely.
- Overcrowding the pan — Squeezing in too many pieces dropped the oil temperature so much that the crust absorbed oil instead of crisping. Fry in smaller batches, even if it takes two rounds.
- Draining on paper towels — The trapped steam turned my beautiful crispy crust soggy within minutes. A wire rack lets air circulate so the coating stays shatteringly crisp.
- Using cold chicken — Frying fridge-cold meat plunged the oil temperature down, resulting in greasy, undercooked chicken. Letting it sit at room temperature 30 minutes made all the difference.
- Not checking internal temperature — I trusted visual cues alone and ended up with dried-out white meat. A quick thermometer check at 165°F guarantees perfectly cooked chicken every time.
Healthier Ways to Make Pioneer Woman Fried Chicken
You can lighten this up without sacrificing the soul of the dish. These tweaks cut calories and fat while keeping the crispy texture intact.
- Oven-fried method — After a quick 5-minute fry per side at 325°F to set the crust, transfer to a wire rack on a baking sheet and finish in a 375°F oven for 15–20 minutes. Less oil, same crunch.
- Skinless chicken parts — Removing the skin before brining cuts a significant amount of fat and calories. The buttermilk keeps the meat moist even without it.
- Whole wheat flour blend — Swap half the all-purpose flour for whole wheat to boost fiber. The texture turns slightly nuttier but remains crisp.
- Air fryer adaptation — Cook the coated chicken at 375°F for 20–25 minutes, flipping halfway. You will use a fraction of the oil and still get a crunchy exterior.
- Reduced buttermilk — Use low-fat buttermilk in both the brine and the dredging wash. The flavor difference is minimal, but the fat savings add up across four servings.
Ingredient Substitutions for Pioneer Woman Fried Chicken
Ran out of something or need to swap for dietary reasons? These substitutions work without compromising the final result.
- Buttermilk → Sour milk — Add 2 tablespoons of lemon juice or white vinegar to regular milk and let it sit 5 minutes. It curdles naturally and mimics buttermilk’s acidity and tang.
- Vegetable oil → Peanut or canola oil — Both have high smoke points perfect for frying. Peanut oil adds a subtle nuttiness that pairs beautifully with the spices.
- Smoked paprika → Regular paprika plus liquid smoke — Use regular paprika and add a drop of liquid smoke to the brine to recover that smoky depth.
- Frank’s RedHot → Any vinegar-based hot sauce — Crystal or Louisiana hot sauce both bring the same acidity and chili heat. Avoid thick styles like Sriracha.
- Whole chicken → Chicken parts — Buy pre-cut thighs, drumsticks, and breasts instead. Just adjust fry times since smaller pieces cook faster.
- All-purpose flour → Gluten-free flour blend — A 1:1 gluten-free flour with xanthan gum works for the coating. The texture may be slightly less craggy but still crunchy.
Unexpected Ways to Enjoy This Pioneer Woman Fried Chicken
This chicken is fantastic on its own, but once you have leftovers, these ideas will give them a second life.
- Fried chicken sandwich — Shred the meat, pile it on a toasted brioche bun with pickles and a drizzle of honey, and you have lunch sorted.
- Breakfast hash — Cube leftover chicken and crisp it up in a skillet with potatoes, onions, and a fried egg on top for a hearty morning meal.
- Waffle topping — Place a crispy piece on a warm Belgian waffle and drizzle with maple syrup. Sweet and salty at its finest.
- Salad topper — Slice the chicken into strips and lay them over a bed of greens, tomatoes, and buttermilk ranch dressing for a satisfying main salad.
- Chicken and biscuits — Serve the fried chicken over flaky biscuits and smother everything in white sausage gravy for a true Southern brunch.
Best Tips for Pioneer Woman Fried Chicken Success
These are the details that separate good fried chicken from unforgettable fried chicken. Pay attention to these and you will nail it every time.
- Pat the chicken dry — Before brining, remove excess moisture with paper towels so the buttermilk clings properly and the coating adheres evenly.
- Let the brine work overnight — Two hours is the minimum, but 12–24 hours produces noticeably more tender, flavorful meat. The acid needs time to penetrate.
- Press flour firmly — Do not just toss the chicken in the flour. Press it in with your hands so the coating covers ridges and crevices completely.
- Mind your oil temperature — Keep the flame at medium-high and adjust as needed. If the oil starts smoking, it is too hot and will burn the crust before cooking the inside.
- Avoid turning too often — Let each side fry undisturbed until golden brown before flipping. Frequent turning prevents the crust from setting properly.
- Season while hot — A pinch of flaky kosher salt immediately after frying adheres to the hot oil on the crust, seasoning every bite perfectly.
- Rest before serving — Five minutes on the rack lets the juices redistribute through the meat. Cutting in too early sends all that moisture running out.
Tasty Twists on Pioneer Woman Fried Chicken
Once you master the base recipe, these variations open up a whole new world of possibilities. Pick one and run with it.
- Spicy Nashville-style — Add 2 tablespoons of cayenne to the flour and brush the finished chicken with a mix of hot sauce, brown sugar, and melted butter.
- Herb and lemon — Add 1 tablespoon of dried thyme and 1 teaspoon of lemon zest to the seasoned flour for a bright, aromatic crust.
- Garlic parmesan — After frying, toss the hot chicken in melted butter with minced garlic and grated parmesan for a rich, savory finish.
- Honey butter glaze — Whisk together melted butter, honey, and a pinch of cayenne, then brush over the hot chicken right before serving.
- Buttermilk ranch chicken — Add a packet of ranch dressing mix to the flour along with extra garlic and onion powder for a tangy, herby crust.
- Cornflake crust — Crush cornflakes and mix them half and half with the flour for an extra-crunchy coating that rivals the original.
Best Ways to Store Your Pioneer Woman Fried Chicken
Proper storage keeps this chicken tasting fresh for days. Here is how to handle leftovers like a pro.
- Refrigerator method — Place cooled chicken in an airtight container and refrigerate for up to 3 days. Stuff a paper towel in the container to absorb excess moisture.
- Freezer approach — Arrange chicken in a single layer on a baking sheet and freeze until solid, about 2 hours. Transfer to a freezer-safe bag or container for up to 3 months.
- Vacuum sealing option — For longer freezer storage, vacuum-seal individual pieces. This prevents freezer burn and preserves flavor for the full 3 months.
- Layer with parchment — When stacking in containers, separate layers with parchment paper to stop pieces from sticking together.
Ways to Warm It Up Again
Reheating fried chicken without turning it soggy is an art. These methods preserve as much crispness as possible.
- Oven reheating — Place on a wire rack over a baking sheet and heat at 400°F (200°C) for 10–12 minutes. Frozen chicken needs about 20 minutes. The wire rack keeps air circulating under the crust.
- Air fryer — Cook at 375°F (190°C) for 5–7 minutes, shaking the basket once. This method brings back the crunch remarkably well in a short time.
- Skillet method — Heat a thin layer of oil in a cast-iron skillet over medium heat and fry the chicken 2–3 minutes per side until heated through and crispy.
- Avoid the microwave — It turns the crust rubbery and steaming hot in all the wrong ways. If you must, wrap in a paper towel and microwave in 30-second bursts.
Nutritional Breakdown (per serving)
Based on 1 serving = one portion out of 4 total. These numbers assume the full recipe with all ingredients as written.
- Calories — 780 per serving
- Protein — 58g
- Fat — 43g
- Carbohydrates — 35g
- Fiber — about 2g
- Sugar — around 6g
- Sodium — roughly 1500mg
Try These Recipes
Wrapping It Up
This Pioneer Woman Fried Chicken brings the buttermilk brine, the spiced flour, and the careful frying technique together into something special. Take your time with the coating and respect the oil temperature — that is really all it takes. Make this for a weekend dinner or a special occasion, and you will understand why it has become such a beloved classic.
PrintPioneer Woman Fried Chicken

This iconic fried chicken delivers a shatteringly crisp, golden crust that gives way to impossibly juicy, tender meat. Brined in seasoned buttermilk and coated in a spiced flour blend, every bite is savory, lightly peppery, and deeply satisfying—a true Southern classic.
- Prep Time: 30
- Cook Time: 30
- Total Time: 165
- Yield: 4 1x
- Category: Main Course
- Method: Stovetop
- Cuisine: American
Ingredients
- 1 whole chicken (about 4 lb / 1.8 kg), cut into 10 pieces (2 breasts halved, 2 thighs, 2 drumsticks, 2 wings)
- 2 cups / 480 ml buttermilk, full-fat
- 2 tbsp / 30 ml hot sauce (e.g., Frank’s RedHot)
- 1 tbsp / 12 g kosher salt, plus more for seasoning
- 1 tsp / 2 g black pepper, freshly ground
- 2 cups / 256 g all-purpose flour
- 1 tbsp / 12 g baking powder
- 1 tsp / 2 g smoked paprika
- 1 tsp / 2 g garlic powder
- 1 tsp / 2 g onion powder
- 1/2 tsp / 1 g cayenne pepper (optional, for heat)
- 2 cups / 480 ml buttermilk, for dredging
- 4 cups / 960 ml vegetable oil, for frying (canola or peanut oil)
Instructions
- Start by preparing the brine. In a large mixing bowl or resealable plastic bag, combine 2 cups of buttermilk, hot sauce, 1 tablespoon of kosher salt, and 1/2 teaspoon of black pepper. Stir until the salt is fully dissolved.
- Add the chicken pieces to the buttermilk mixture, ensuring each piece is fully submerged. Cover and refrigerate for at least 2 hours, or up to 24 hours for maximum tenderness. The acid in the buttermilk helps tenderize the meat and infuses it with flavor.
- When ready to cook, remove the chicken from the fridge and let it sit at room temperature for 20–30 minutes. This takes the chill off the meat, ensuring even cooking and preventing the oil temperature from dropping too much.
- Prepare the seasoned flour coating. In a shallow dish or pie plate, whisk together the all-purpose flour, baking powder, smoked paprika, garlic powder, onion powder, cayenne (if using), and remaining 1/2 teaspoon of black pepper. The baking powder adds extra crispness to the crust.
- Pour the remaining 2 cups of buttermilk into a separate shallow dish for the wet stage. Set up a dredging station: chicken from the marinade, buttermilk wash, seasoned flour, and a wire rack lined with paper towels.
- Take one piece of chicken from the marinade, letting excess buttermilk drip off. Dip it into the plain buttermilk, then transfer to the seasoned flour. Press the flour onto the chicken thoroughly, ensuring every nook and cranny is coated. Shake off excess and place on the wire rack. Repeat with all pieces. Let the coated chicken rest for 10–15 minutes—this helps the coating adhere during frying.
- Pour the vegetable oil into a large, deep cast-iron skillet or Dutch oven, filling it to a depth of about 1 inch (2.5 cm). Heat over medium-high heat until the oil shimmers and a pinch of flour dropped in sizzles immediately. If you have a deep-fry thermometer, aim for 350°F (175°C). The oil should be hot but not smoking.
- Carefully place a few pieces of chicken into the hot oil, skin-side down, in a single layer. Do not overcrowd the pan—work in batches if necessary. Leaving space between pieces ensures the oil temperature stays steady and the crust crisps evenly.
- Fry the chicken, turning every 3–4 minutes with tongs, until deep golden brown and cooked through. For dark meat, this takes about 12–15 minutes; white meat, 10–12 minutes. The internal temperature should register 165°F (74°C) in the thickest part of the meat, and the juices should run clear when pierced.
- Use tongs to transfer the finished chicken to a clean wire rack set over a baking sheet to drain. Sprinkle immediately with a pinch of flaky kosher salt while hot. Do not place on paper towels—this traps steam and makes the crust soggy. Rest for 5 minutes before serving to allow the juices to redistribute.
- If frying in batches, return the oil to 350°F (175°C) between batches and ensure the oil is not cloudy or full of burnt bits. Skim any debris with a fine-mesh strainer if necessary.
- For an oven alternative, preheat the oven to 375°F (190°C). After frying at 325°F (165°C) for 5 minutes per side to set the crust, transfer the chicken to a wire rack on a baking sheet and finish in the oven for 15–20 minutes until the internal temperature reaches 165°F (74°C). This method ensures even cooking with less hands-on time.
- Serve immediately while hot and crispy, with a side of coleslaw, mashed potatoes, or honey drizzle for a sweet-savory twist.
- Always practice oil safety: never leave hot oil unattended, keep a lid nearby, and allow the oil to cool completely before disposing of it.
Notes
For storage: refrigerate leftover fried chicken in an airtight container for up to 3 days. To freeze, place the chicken in a single layer on a baking sheet, freeze until solid, then transfer to a freezer-safe bag or container for up to 3 months. To reheat: for best crispness, reheat in a 400°F (200°C) oven on a wire rack for 10–12 minutes (or 20 minutes from frozen). You can also reheat in an air fryer at 375°F (190°C) for 5–7 minutes. Avoid microwaving, which makes the crust soggy.
Nutrition
- Calories: 780
- Sugar: 6g
- Sodium: 1500mg
- Unsaturated Fat: 10g
- Carbohydrates: 35g
- Fiber: 2g
- Protein: 58g
- Cholesterol: 210mg
Keywords: Pioneer Woman fried chicken, Southern fried chicken, buttermilk fried chicken, crispy fried chicken, chicken recipe, comfort food, family dinner, fried chicken, buttermilk brine, cast iron fried chicken