
 Anabelle
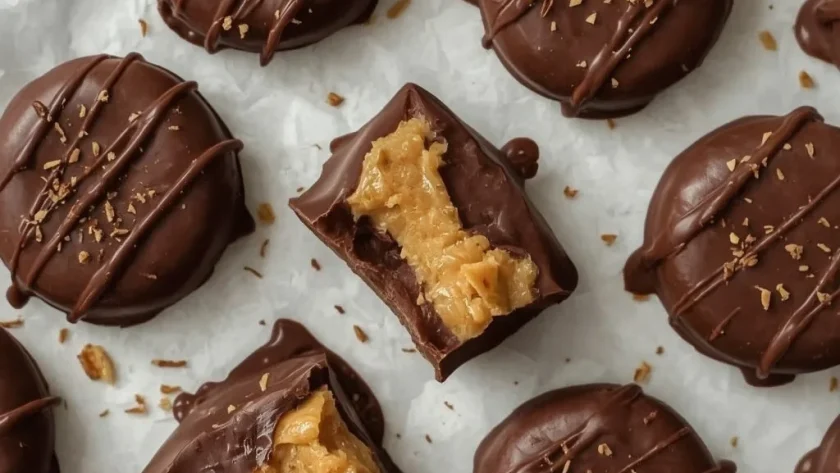
 Pioneer Woman Christmas Candy is exactly what you want from a homemade holiday treat. It pairs a creamy, soft peanut butter center with a shell of semi-sweet chocolate that snaps when you bite into it. This no-bake recipe comes together in about 85 minutes total, with only 15 minutes of active prep, making it a solid beginner-level project. The only tricky part is tempering the chocolate the right way so it sets firm and glossy.
You get a decent yield—16 candies from a single batch—and they keep beautifully in the fridge for weeks. This is the kind of candy you make for cookie swaps, gift tins, or just to have on hand when the sugar cravings hit during the holidays.
A Quick Glimpse at Pioneer Woman Christmas Candy
This candy starts with a simple peanut butter dough made from creamy peanut butter, softened butter, powdered sugar, vanilla, and salt. You shape it into small discs, chill them until firm, then dip each one into melted semi-sweet chocolate with a little vegetable shortening for a smooth finish. The interior stays soft and slightly crumbly, while the chocolate exterior firms up with a clean snap. It’s a classic American confection that shows up on dessert trays all through December.

Why This Recipe is Worth Trying
- No oven required — This is a completely no-cook dessert, so you don’t have to compete for oven space during the busy holiday season.
- Simple ingredients — You only need seven items, and most are pantry staples like peanut butter, powdered sugar, and chocolate.
- Beginner-friendly method — The steps are straightforward, and the only real skill you need is patience while the chocolate sets.
- Long shelf life — These candies keep for up to 2 weeks in the fridge or 3 months in the freezer, so you can make them well ahead of time.
- Customizable finish — You can top them with flaky sea salt, crushed candy cane, or a drizzle of extra chocolate for a personal touch.
Essential Ingredients for This Recipe
Every ingredient here plays a specific role in texture or flavor. Stick with the exact amounts listed for the best results.
The Peanut Butter Base
- 1 cup creamy peanut butter — This provides the main flavor and structure. Use a standard commercial creamy peanut butter, not the natural kind that separates, because the oil content is more consistent.
- 1/4 cup unsalted butter, softened to room temperature — Adds richness and helps bind the dough. Softened butter blends more easily than cold butter, so let it sit out for about 30 minutes before starting.
- 1 1/2 cups powdered sugar — Sweetens the filling and gives it that soft, slightly crumbly texture. Sifting it first prevents lumps.
- 1/2 teaspoon vanilla extract — Rounds out the peanut butter flavor without overpowering it.
- 1/4 teaspoon fine sea salt — Balances the sweetness and enhances the chocolate. Table salt works fine, but cut the amount to 1/8 teaspoon since it’s saltier.
The Chocolate Coating
- 8 ounces semi-sweet chocolate, finely chopped — Provides the crisp outer shell. Chop it evenly so it melts smoothly. Chocolate chips work in a pinch but may not flow as evenly for dipping.
- 1 teaspoon vegetable shortening — This helps thin the chocolate and gives it a glossy, snappy finish. Coconut oil is a fine substitute if you prefer.
Useful Equipment
- Electric hand mixer — Beats the peanut butter and butter together quickly and thoroughly. A stand mixer with the paddle attachment also works.
- Small cookie scoop or teaspoon — Portions the dough into even balls so all your candies are the same size. A melon baller is a solid alternative.
- Parchment-lined baking sheet — Gives the candies a non-stick surface to set on. Wax paper works too, but parchment is more reliable.
- Microwave-safe bowl — For melting the chocolate gently. Glass or ceramic bowls are best because they heat evenly.
- Standard fork — Used for dipping and turning the candies in chocolate. A dipping fork or a skewer also works, but a regular fork does the job perfectly.
Directions to Make Pioneer Woman Christmas Candy
Here is the process broken down into clear steps. Follow them in order, and pay close attention to the chilling times—they make or break the final texture.
- Mix the base — Beat 1 cup creamy peanut butter and 1/4 cup softened unsalted butter with an electric hand mixer on medium speed until smooth, about 1 minute. Scrape the bowl down as needed.
- Add dry ingredients — Add 1 1/2 cups powdered sugar, 1/2 teaspoon vanilla extract, and 1/4 teaspoon fine sea salt. Beat on low first to keep the sugar from flying, then increase to medium and mix until a stiff dough forms. It should hold together when pinched.
- Shape the discs — Portion the dough into 16 equal balls, each about 1 inch in diameter, using a small cookie scoop or teaspoon. Roll each ball smooth, then flatten into a disc about 1/2 inch thick with your fingers or the back of a fork.
- Chill the discs — Place the baking sheet in the refrigerator and chill for at least 30 minutes until firm. This step is critical: cold discs won’t crumble when you dip them into warm chocolate.
- Melt the chocolate — Combine 8 ounces finely chopped semi-sweet chocolate and 1 teaspoon vegetable shortening in a microwave-safe bowl. Microwave in 30-second intervals at 50% power, stirring well after each, until mostly melted. Stir until the residual heat melts the rest completely.
- Dip the candies — Drop one chilled disc at a time into the melted chocolate. Use a fork to turn it and coat it completely. Lift it out, tap the fork on the bowl edge to let excess chocolate drip off, then slide it onto the parchment-lined sheet. Use a toothpick to help release it if needed.
- Add toppings (optional) — While the chocolate is still wet, press a flake of sea salt or a sprinkle of crushed candy cane onto each candy. Or drizzle extra melted chocolate over the tops with a fork.
- Let them set — Let the candies sit at room temperature for about 30 minutes until the chocolate is firm. If your kitchen is warm, pop them in the fridge for 10 minutes to speed things up.

What I Got Wrong (And How I Fixed It)
- Overmixing the dough — I beat it too long and the filling turned oily. Mix just until a stiff dough forms and stop.
- Skipping the chill — I dipped unchilled discs and half of them fell apart in the chocolate. Always chill the discs for a full 30 minutes first.
- Burning the chocolate — I used full power in the microwave and ended up with scorched, grainy chocolate. Use 50% power and short intervals, stirring every 30 seconds.
- Uneven coating — I didn’t tap the fork enough, so some candies had thick blobs of chocolate. Tap the fork firmly on the bowl edge to get a thin, even coat.
- Chocolate thickened mid-way — I left it sitting too long and it became too thick to dip. Reheat it gently using the same low-power method for a few seconds.
Healthier Ways to Make Pioneer Woman Christmas Candy
- Natural peanut butter swap — Use a no-sugar-added natural peanut butter. The texture will be slightly less smooth, but you cut back on added sugars.
- Dark chocolate coating — Replace semi-sweet chocolate with 70% dark chocolate. This reduces sugar and adds more antioxidants.
- Powdered sugar alternative — Use a powdered monk fruit or erythritol blend. The sweetness will be similar, but the texture may be slightly grainier.
- Reduce the butter — Cut the butter to 2 tablespoons instead of 1/4 cup. The filling will be a little less rich, but it still holds together.
- Skip the shortening — Omit the vegetable shortening entirely. The chocolate will be slightly thicker, but a good-quality chocolate will still set well.
Ingredient Substitutions for Pioneer Woman Christmas Candy
- Creamy peanut butter → Almond butter or sun butter — Works well for a nut-free version or for variety. Sun butter is darker and slightly thinner, so you may need a touch more powdered sugar.
- Semi-sweet chocolate → Milk chocolate — This makes the candy sweeter and softer. Reduce the shortening to 1/2 teaspoon because milk chocolate is thinner when melted.
- Vegetable shortening → Coconut oil — Use refined coconut oil for a neutral flavor. It works exactly the same way and helps the chocolate set with a glossy finish.
- Unsalted butter → Salted butter — Skip the added salt in the recipe if you use salted butter.
- Powdered sugar → Coconut sugar ground into powder — Grind coconut sugar in a spice grinder until it’s powdery. The flavor is slightly caramel-like and deeper.
- Vanilla extract → Almond extract — Swap in an equal amount. The almond flavor pairs beautifully with chocolate and peanut butter.
Unexpected Ways to Enjoy This Pioneer Woman Christmas Candy
- Crumbled over ice cream — Chop a candy or two and sprinkle it over vanilla or chocolate ice cream for a crunchy, salty-sweet topping.
- Chopped into cookies — Fold chopped candies into sugar cookie or shortbread dough before baking. The chocolate and peanut butter bits add pockets of flavor.
- Melted into hot chocolate — Drop a candy into a mug of hot milk and stir until it melts. You get a rich, peanut butter hot chocolate with no extra effort.
- Sandwiched between graham crackers — Place a candy between two graham crackers with a smear of marshmallow fluff for a quick s’mores-style treat.
- Garnish for cheesecake — Place a whole candy on top of a slice of plain cheesecake. The chocolate and peanut butter add a festive, indulgent touch.
- Frozen as a snack — Eat them straight from the freezer. The texture becomes firmer and the chocolate snaps even more cleanly.
Best Tips for Pioneer Woman Christmas Candy Success
- Chill the discs thoroughly — A full 30 minutes in the fridge is non-negotiable. Cold discs hold their shape in warm chocolate without crumbling.
- Use finely chopped chocolate — Chopped chocolate melts more evenly and quickly than large chunks. Pieces about the size of chocolate chips are ideal.
- Work in small batches — Take only a few discs out of the fridge at a time so they stay cold while you dip. If the rest warm up, the chocolate will slide off.
- Tap the fork firmly — After lifting a dipped candy, tap the fork a couple of times on the bowl edge. This removes excess chocolate and gives you a clean, thin coating.
- Reheat chocolate as needed — If the chocolate starts to thicken, microwave it for 10 seconds at 50% power and stir. Thick chocolate gives you lumpy, uneven candies.
- Let set at room temperature first — Room-temperature setting gives a shinier finish than the fridge. Only use the fridge if your kitchen is very warm.
- Store in a single layer — Lay the candies in a single layer in the container, with parchment between layers if you stack them. This prevents them from sticking together or getting scuffed.
Tasty Twists on Pioneer Woman Christmas Candy
- Crunchy peanut butter version — Use crunchy peanut butter instead of creamy. The small peanut pieces add texture and a nuttier flavor.
- White chocolate drizzle — After the semi-sweet chocolate sets, drizzle melted white chocolate over the top. The contrast in color makes them look more festive.
- Coconut-peanut butter filling — Add 1/4 cup toasted shredded coconut to the peanut butter dough. The coconut adds chew and a tropical note.
- Spiced chocolate coating — Stir 1/2 teaspoon cinnamon and a pinch of cayenne into the melted chocolate before dipping. The warmth complements the peanut butter nicely.
- Peppermint crunch topping — Crush a few candy canes into small pieces and press them onto the wet chocolate. The peppermint adds a classic holiday flavor.
- Salted caramel version — Press a small piece of soft caramel into the center of each disc before chilling. The caramel stays gooey and surprises when you bite in.
Best Ways to Store Your Pioneer Woman Christmas Candy
- Airtight container in the fridge — Place the candies in a single layer in an airtight container with parchment between layers. They stay fresh for up to 2 weeks.
- Freezer in a zip-top bag — Arrange the candies in a single layer in a freezer-safe zip-top bag, press out the air, and seal. Freeze for up to 3 months.
- Room temperature tin (short-term) — For serving within a day or two, store them in a cool, dry place in a sealed tin. Avoid warm spots like near the stove or in direct sunlight.
- Vacuum-sealed for gifting — If you are mailing these, vacuum-seal them in bags. This prevents breakage and keeps the chocolate from blooming during transit.
- Layered with wax paper — If you don’t have airtight containers, wrap each candy individually in wax paper and place them in a box. This protects them from absorbing fridge odors.
Ways to Warm It Up Again
- Oven method — If the chocolate blooms (turns white or dusty), place the candies on a baking sheet in a 200°F / 93°C oven for 2-3 minutes. This re-melts the chocolate surface, and it will set glossy again as it cools.
- Microwave method — For a single candy, microwave on 50% power for 10-15 seconds. The chocolate will soften, so eat it right away or let it reset.
- Room temperature rest — The best way to serve them is to take them out of the fridge 10 minutes before eating. They soften slightly without melting, which gives you the ideal texture.
Nutritional Breakdown (per serving)
Based on 1 serving = 1 portion out of 4 total.
- Calories: 487
- Protein: 11g
- Fat: 35g
- Carbohydrates: 38g
- Fiber: around 4g
- Sugar: about 30g
- Sodium: about 247mg
Try These Recipes
Wrapping It Up
Making a batch of Pioneer Woman Christmas Candy is one of the most satisfying things you can do with a few basic pantry ingredients. The contrast between that soft, peanut buttery center and the snappy chocolate shell is hard to beat. Give this recipe a try for your next holiday gathering, and you will see why it keeps showing up on dessert trays year after year.
PrintPioneer Woman Christmas Candy

This classic Christmas candy combines creamy peanut butter filling with a rich, semi-sweet chocolate coating for a melt-in-your-mouth treat. Each bite has a soft, slightly crumbly interior that contrasts perfectly with the snap of the tempered chocolate exterior. It’s a nostalgic holiday confection that’s as beautiful as it is delicious.
- Prep Time: 15
- Cook Time: 10
- Total Time: 85
- Yield: 4 1x
- Category: Dessert
- Method: No-Cook
- Cuisine: American
Ingredients
- 1 cup creamy peanut butter
- 1/4 cup unsalted butter, softened to room temperature
- 1 1/2 cups powdered sugar
- 1/2 teaspoon vanilla extract
- 1/4 teaspoon fine sea salt
- 8 ounces semi-sweet chocolate, finely chopped
- 1 teaspoon vegetable shortening
Instructions
- Line a baking sheet with parchment paper and set aside. In a large mixing bowl, combine 1 cup creamy peanut butter and 1/4 cup unsalted butter (softened). Use an electric hand mixer on medium speed to beat until smooth and fully incorporated, about 1 minute, scraping down the sides of the bowl as needed.
- Add 1 1/2 cups powdered sugar, 1/2 teaspoon vanilla extract, and 1/4 teaspoon fine sea salt to the peanut butter mixture. Beat on low speed at first to prevent the sugar from flying, then increase to medium and mix until a stiff, cohesive dough forms. The mixture should hold together when pinched.
- Using a small cookie scoop or a teaspoon, portion the peanut butter mixture into 16 equal balls, each about 1 inch in diameter. Roll each ball between your palms until smooth and round, then place them on the prepared parchment-lined baking sheet. Use your fingers or the back of a fork to gently flatten each ball into a disc about 1/2 inch thick.
- Place the baking sheet with the peanut butter discs in the refrigerator and chill for at least 30 minutes, or until firm. Chilling is essential: it prevents the candy from crumbling when dipped into the warm chocolate.
- While the peanut butter pieces chill, prepare the chocolate coating. Place 8 ounces finely chopped semi-sweet chocolate and 1 teaspoon vegetable shortening in a medium microwave-safe bowl. Microwave in 30-second intervals on 50% power, stirring well after each interval, until the chocolate is mostly melted but a few lumps remain. Continue stirring until the residual heat melts the remaining chocolate completely and the mixture is smooth. This gentle method prevents scorching.
- Remove the chilled peanut butter discs from the refrigerator. Working with one disc at a time, drop it into the melted chocolate. Use a fork to gently turn it, coating it completely on all sides. Lift the candy with the fork, tapping the fork gently on the edge of the bowl to allow excess chocolate to drip off.
- Slide each chocolate-coated candy off the fork onto the parchment-lined baking sheet, using a toothpick if needed to help release it. Repeat with the remaining peanut butter discs, placing them about 1 inch apart on the sheet. If the chocolate thickens as it sits, reheat it briefly in the microwave using the same low-power method.
- For a decorative finish, drizzle a little reserved melted chocolate over the tops using a fork, or gently press a single flake sea salt or a sprinkle of crushed candy cane onto each candy while the chocolate is still wet. Let the candies sit at room temperature for about 30 minutes, until the chocolate is set and firm. If your kitchen is warm, place them in the refrigerator for 10 minutes to speed setting.
- Once fully set, the candies can be transferred to an airtight container. They will keep in the refrigerator for up to 2 weeks, or in the freezer for up to 3 months. For serving, let them sit at room temperature for 10 minutes to soften slightly for the best texture.
Notes
Store these candies in an airtight container in the refrigerator for up to 2 weeks, or freeze for up to 3 months. To serve, let them stand at room temperature for 10 minutes to soften slightly. To reheat leftover candies (if chocolate bloom occurs), place them in a 200°F / 93°C oven for 2-3 minutes to re-melt the chocolate slightly, then cool again. Avoid storing at warm room temperature, as the chocolate may soften too much.
Nutrition
- Calories: 487
- Sugar: 30g
- Sodium: 247mg
- Unsaturated Fat: 12g
- Carbohydrates: 38g
- Fiber: 4g
- Protein: 11g
- Cholesterol: 15mg
Keywords: Christmas candy, peanut butter candy, chocolate candy, holiday confection, no-bake candy, easy candy recipe, peanut butter chocolate, classic Christmas treat, homemade candy, festive dessert